Tuesday, September 13, 2011

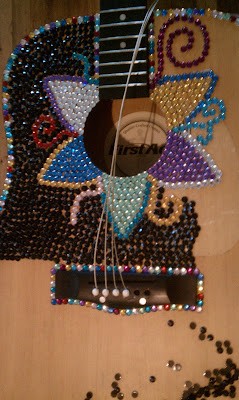
Strum in Style.

Bedazzle (v)- to transform something from drab to fab.

Here are the pictures of the guitar in stages. Bedazzling this guitar was tedious, but then again, it was so much fun! I want to bedazzle everything now! :P 

It took me so long to finish it because for some reason, I didn't think it would take as many rhinestones as it did. I kept having to order the black ones from some Canadian. They took forever to get here every single time.


It has over 3,000 rhinestones on it!
 
I still need to get strings for it,
but it is finished.

Now, I just need to
learn to play. ;)

Saturday, July 30, 2011

Pottery and Post-its.


Just some stuff Cody, Lauren, and I have done recently.


Left half painted by Cody.
Right half painted by Lauren.


Lauren's peacock.


Cody was inspired by the flames of our dad's motorcycle.
J is for John.


I did this.
Supposed to be the tree of life
with colorful leaves.
Looks Christmasy.


"All you need is love."


"Happiness is always here
but covered by
thoughts, desires, and fears."


Thursday, July 7, 2011

Peacock Painting WINNER!

And the winner is...


Thank you to everyone who entered!
Be on the lookout for more giveaways. :)

Wednesday, July 6, 2011

Sport Perennial.

A new painting.
I quite adore trees.


Can you tell it's a tree?
I hope so.

Wednesday, June 29, 2011

Peacock Painting GIVEAWAY!

After a two and a half month neglect, I'm coming back with a bang. And a giveaway. 


This painting is on canvas, but it is not a mounted canvas. However, my idea in having a thin canvas is so you can dress up the way you display it. I envisioned that this piece would hang on the wall and around it would hang a somewhat larger frame so the painting is within the frame, but not touching it. It would be a decoratively carved frame, thick and bulky, and I would paint it a teal blue (and maybe give it a weathered/antique look) to give it a little edge. 


Now, that is just my idea... you can do with it what you wish.


P.S. It's a peacock.

If you would like to be in the drawing, you must 1. be a subscriber of this blog and 2. leave a comment below this post telling me how you are going to (or would like to) display this painting. I will draw the winner on July 7th (a week from tomorrow).

I do get page views from countries outside of the US, but I am sorry, the winning address must be inside the US. (I will get the address of the winner when the name is drawn.)

Thank you for subscribing and entering in the contest!

Wednesday, April 13, 2011

I Heart Shadow Letters Contest Winner!

Congratulations to the winner!


Thank you to everyone who entered!
I hope to do more contests in the future.


With love,
Cassie

Tuesday, April 5, 2011

CONTEST: I Heart Shadow Letters.

It's a Smartt Designs giveaway!


It's simple, but who could resist a free piece of art designed and hand painted by Cassie Smartt herself?! ;)


If you would like to be in the drawing (good old fashioned "draw a name out of a hat"), you must become a subscriber of this blog and leave a comment below this post saying "I heart..." and tell me something you love. I will draw the winner on April 13th (a week from tomorrow). 


I do get page views from countries outside of the US, but I am sorry, the winning address must be inside the US. (I will get the address of the winner when the name is drawn.)


Thank you for subscribing and entering in the contest!


With love,
Cassie

Sunday, April 3, 2011

Sons of Shamgar: The Unknown Warriors.

The Sons of Shamgar is the self-named men's league softball team for Christian Heritage Church.


There is only one verse that acknowledges Shamgar: Judges 3:31, "After Ehud came Shamgar son of Anath, who struck down six hundred Philistines with an oxgoad. He too saved Israel." On an individual level, Shamgar is just a man... a sinful, unworthy man like each of us. But God uses him in a mighty way. Only when we zoom out and look at the big picture can we see that Shamgar's life and triumph were for the greater glory of God's plan. The same can be said about each of our lives when we live for God. He will use us in mighty ways that we can not even imagine. God used this unknown warrior to defeat 600 men... something Shamgar could not have done himself without the help of his Savior, the same One who is our loving Savior. 


I made this for this amazing softball team. :)


The background is the entire passage of Judges 3 (the big plan), ending in red with the verse about Shamgar (only one piece of the puzzle).


With love,
Cassie

Wednesday, March 30, 2011

Upcycle a chair.

I finally have a chair for my room!


<-- BEFORE


AFTER -->


This is a $6 chair that I got from GoodWill! They have so many great fixer-uppers there... can't wait to get my hands on them. ;)


I stripped the chair down to it's skivvies and used an electric sander on the wood.


I applied two coats of black paint. I kept finding very important places that I missed and the ugly brown was showing through, hence the second coat.

Say hello to Mr. Piggy Bank in the background! :D
I used the same board for the seat, but I pulled off that awful fabric and old, nasty cushion and threw them in the trash. I found a pack of two great cushions at Walmart and used both for extra comfort for the ending result. I also got the fabric for the seat at Walmart. I chose the same fabric that I used in the dry erase photo frame I made for myself... I love that antique looking yellow!


I pulled the fabric tight around the edges of the underside of the board and used a staple gun to hold it in place. It looks rough, but no one sees that part... so do what you've got to do.


Use the screws to put the seat back in place and... voila, you have a great looking chair!

With love,
Cassie

Thursday, March 24, 2011

Fun Flats


Design your own cute, fun flats!
Usually I don't care much for
the color red, but I thought it would
be fun to own a pair of red flats.
The only problem was
was that I couldn't find a pair I
actually liked. Therefore, I made
my own. They turned out quite
nicely if I say so myself.


I bought a $3 pair of flats from Walmart.
Who says you can't be thrifty while
being creative? You could also use
an old pair that aren't getting
much use.

Of course, I cut the bow off of them
before starting the bulk of the process.


Cut a piece of your fabric of choice
so that it has more than enough
to fit from top to bottom and lengthwise.
Next, cut the fabric in half up to
the point of the inner rim of the front
of the shoe.


Cover the front of the shoe with
Mod Podge (I used outdoor Mod Podge
because it is supposed to be waterproof).
Put the fabric in place and smooth it out.


Cover the rest of the shoe in Mod Podge
and smooth the fabric down all the way
to the back of the shoe.


Cut slits in the top of the fabric down to the
level of the inner rim of the shoe.
This will help give the shoe a smoother
edge. Mod Podge the flaps down
both under and on top of the fabric.


Using an Exacto Knife (or something similar),
cut the remaining fabric from the bottom of the
shoe so that it lines up where the side and
the sole meet.


When all is in place,
put a good layer of Mod Podge over
the entire shoe. Be generous, it will dry clear.
Let them dry for quite a while
(I recommend letting them sit for a day)
to make sure they are fully dry
and ready to wear.

Then put them on and be the talk of the crowd.
;)


With love,
Cassie

Monday, March 21, 2011

Eiffel Tower Silhouette on Canvas


Materials:
-Canvas
-French books
(I used French to English dictionary and a random book written in French)
-Mod Podge
-Scissors
-Black paint
-Paint brush


Pull pages out of each book. Arrange the pages on the canvas first, without using the Mod Podge. Have edges of the pages sticking off of the canvas so you can fold them around to the back, giving the sides of your canvas the same book page background. When all is in place, ModPodge away. (Amazing stuff, isn't it?! :P) I put the Mod Podge on the back and front of the pages... not only does it glue everything down, but it will wrinkle the pages a little, giving the canvas a great texture. 


When the pages dry, paint the silhouette of whatever you'd like. I chose the Eiffel Tower to go along with the French page thing.

I gave this to Ashley to go along with her Paris themed bedroom. What do you think?


With love,
Cassie

Saturday, March 19, 2011

Dry Erase Photo Frame


Materials:
-Picture frame
-Fabric of your choice
-Mod Podge
-Pack of dry erase markers
-Scissors


Cut the fabric to fit the shape of the backboard of the frame and use Mod Podge to glue it down in place. Put the backboard back in place, and you've got yourself a pretty frame/art piece and dry erase board all in one.


Really easy to make, really useful and cute. Use it for quick notes, reminders, lists, anything... and when the writing is wiped off, the frame makes for pretty decor.


With love,
Cassie

Tuesday, March 15, 2011

Welcome to the Club.

Hey guys, welcome to the new branch of Cassie's blogosphere!


I have always enjoyed crafting things and making plain things pretty so I am dedicating an entire blog to this art. I am excited to share the things I make with you and even give you a how-to on the projects so you can do them yourself. By all means, let me know what you think about each project... I would love feedback!


I hope you enjoy this as much as I will. :)


And don't forget to follow me on here and my other blog! (They are separate blogs, so they have to be followed separately.)


With love,
Cassie